I’ve been looking forward to this review for a while. My current main search and passion is to find a performing, HD cinewhoop that flies like a toothpick. And the short of it is, that I think I found it, and that’s why I’m going to be reviewing, setting up and flying the GEPRC Skip3 HD.
As a simple micro cinewhoop, I’ve loved flying the Mobula7 HD for over a year now, and to be fair I can still recommend it today, for some use cases. What I wish it did slightly better would be to have just a tad more performance at mid throttle.
On the other hand, getting into toothpicks last year with the GEPRC Phantom and the Emax Tinyhawk Freestyle was a very fun experience. These little quads fly and handle superbly and are to date my favorite toothpicks. They are such a joy to fly but cannot record full HD videos.
So the obvious question was “can we have that performance but also enjoy a 1080p HD video recording from a split camera”. And this is the use case the Skip3 HD is trying to cover: give you full HD recording while flying like a racer.
If you prefer watching, check out the full video review on my YouTube channel:
📦 Unboxing
Having unboxed a few other GEPRC products so far, the unboxing experience is pretty consistent and minimalistic. You get a GEPRC branded box with the items inside.
While on one hand, it’s nice to get a higher quality carry case (like you do with some drones), if the goal in GEPRC’s case is to reduce the price by simply providing a box, then I’m on board. I can also confirm that although I always expected myself to toss the box aside after the initial setup, I always ended up actually keeping it and using it to transport the quad and its spare parts by tossing the box in my backpack.
The contents of the box are wrapped in protective foam from all sides and the quad comes wrapped in plastic film too.
Here is everything you get inside: the GEPRC Skip3 HD itself, a vtx channel table, FrSky XM+ receiver instructions, GEPRC stickers, 8 3 inch bi-blade propellers and a pack of extra items.
In the additional items pack, you can find camera configuration joystick, screwdriver, hex tool, landing leg sticky foam padding, an extra battery velcro strap, spare screws, antenna tubes, and tube end tips.
I also had a Turnigy Graphene 4S 500mAh battery lying around, which came in much heavier at 149.7 grams all up weight. I’m a much bigger fan of GNB batteries, so besides for a few test flights, I probably won’t be flying the Turnigy battery.
The quad looks gorgeous overall, but let’s talk specs.
The Skip3 HD comes with the same motors you might have seen earlier on the GEPRC CinePro 4K - GR1105 5000KV. At this KV this a quad intended to run on 4S batteries, although you could go as low as 2S. Whatever the case, however, the product page warns about not running tri-blade props, since those would draw more current and you could burn a motor. I’ll probably test that for you, so you don’t have to take the chance, but more on that in the flying section below.
The props that the GEPRC Skip3 HD comes with are 75mm bi-blade propellers that weigh just under a gram (0.9g).
The motor wires are braided which is a nice touch if you’re into that sort of thing. More importantly, they are held securely to the frame arms with a sturdy “cloth-based” sticky tape. The motors are plugged into the all-in-one (AIO) board with a connector (not directly soldered). Some people say there’s some extra performance to be had with the direct solder approach, I think that’s nearly negligible in this case and min-maxing, but if you want to squeeze every little bit of performance, you could consider direct soldering. For me, that’s an overkill at this point.
The camera is the Caddx Baby Turtle V2. This is a “split” type camera that is used for the real-time FPV feed, as well as to record onboard 1080p 60fps footage at ~ 30 Mbit bit rate. I dare add that it’s one of the best split time cameras nowadays (2019 / 2020).
It can also record at 1080p 30fps and 720p 60fps if you feel like downgrading the quality, but chances are you probably don’t need to do that.
This camera can record audio, which was ever so slightly less horrifying but even so, pretty much unusable. The motor noise is loud and high-pitched which probably won’t allow for any other sound to be picked up from the environment. Unfortunately, that’s pretty much the case with all of these cameras and we yet have to see a split type camera with useful audio recording.
The output file format of the Caddx Baby Turtle V2 is MP4 and it supports class 10 SD cards with storage ranging from 8GB to 64GB. On average for a 6 minute flight the 1080p 60fps recording is about 1.36GB.
The canopy is a pretty nice, high-quality TPU print that lets you adjust the camera angle from about 28 degrees to about 45 degrees.
On the backside of the canopy, there are slots for the VTX’s dipole antenna, as well as for the receiver antennas. The VTX is power-switchable between 25/100/200mW.
A capacitor is soldered to and shrink-wrapped together with the xt30 connector. This is pretty much a standard nowadays, so nothing special about it.
A battery strap comes pre-installed under the quad, where we also have a rubber battery pad to provide additional grip and keep your battery in place when flying around or in crashes.
This is how the flight stack is set up on the inside.
At the bottom, we have a GEP-12A-F4 AIO board. As the name states, it should support continuous current up to 12A on a 2S to 4S battery. The firmware target for the flight controller is MATEKF411.
Above the flight controller board is the Caddx Baby Turtle V2 board (this is also where you would plug in your SD card). On top of that is the VTX and on top of the VTX is the receiver (in my case, the FrSky XM+).
And all of that comes currently at about ~ $170, which in my opinion is a pretty good deal for an HD toothpick drone.
⚙ Setup
To get up and running with the GEPRC Skip3 HD we wound need to bind the quad to a radio transmitter, take a look at the Betaflight config, install antenna tubes, consider battery mounting options, put on the props and get out flying.
🔗 Bind the receiver to a radio
To get the quad bound, you will have to set your radio in bind mode from the setup screen, then plug in a battery to the drone while keeping the FrSky XM+ receiver’s bind button pressed. If the binding is successful, one of the LED’s will be in solid green, while the other will be blinking in red. At this point power cycle the quad and you should be able to see only 1 solid green LED on.
If you have any issues, drop me a comment down below or on YouTube, and I’ll try to do my best to help you solve your issue.
🐝 Check the Betaflight configuration
TAKE OFF THE PROPS if you have them on for whatever reason. While working in Betaflight, we want props off at all times!
I always recommend you back up the existing Betaflight configuration before making any changes, just in case things get messy and you want to roll back. I’ll show you how to do just that, but in case you didn’t back up your config on time, here’s a copy of my GEPRC Skip3 HD stock configuration (mine came with Betaflight 3.5.7).
To produce your own backup, connect the quad to your computer via the micro USB port, start Betaflight, and go to the CLI tab. Type dump in the command box input and press enter. Then click the button to save the config dump to a file. This is a full configuration dump and could be useful to roll things back to the way they were, should you need to do so.
Next, let’s go through the way the quad is setup out of the box by the folks from GEPRC.
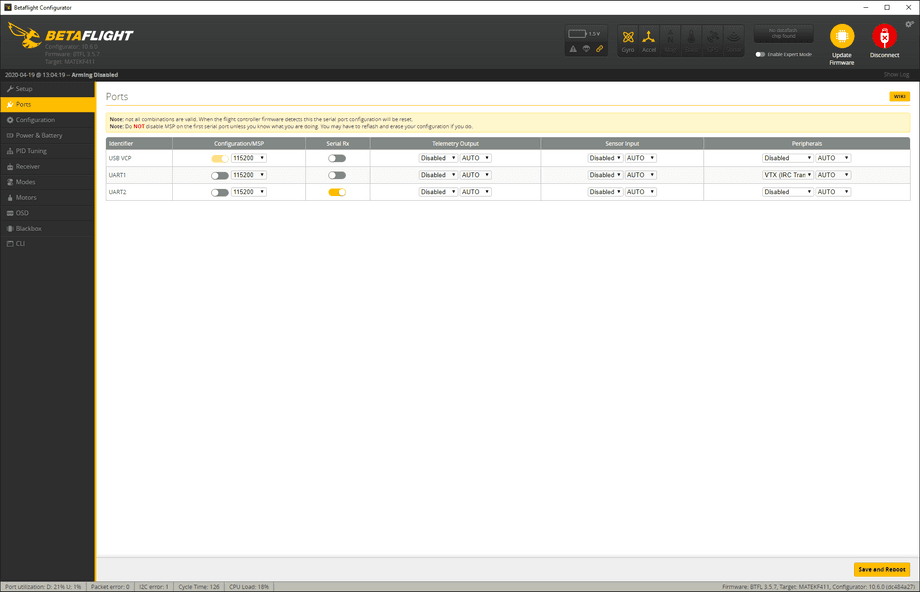
Ports tab
Nothing special here, but leaving this here in case you were wondering what the defaults are for this tab.
Configuration tab
On the configuration tab, we learn that the quad is set up in the more common Props in mode, which informs us how we would be putting on our propellers later. I like having MOTOR_STOP off, and I am happy to find that it’s off by default. Double-check that the receiver is set up correctly too - Serial based receiver and SBUS should be selected when dealing with the FrSky XM+ receiver. All good there.
A bit further down the page I like taking a look at the other features section to make sure AIRMODE is on. You want that on if you are planning to do any acro tricks. OSD is on too, and the Dshot Beacon Configuration is also on, which is great and allows us to use the motors to do some beeping (since this model does not have a dedicated buzzer).
PID tuning tab
These are the default PID values. I never make changes to the stock tune, because I think it’s very valuable to fly the quad on the stock config to evaluate how it performs as it comes setup straight out of the factory so to speak.
Receiver tab
The receiver tab is one of the most important ones to check. You don’t want to be attempting flying if the channel mapping between your radio transmitter and the drone are set up incorrectly.
That’s very easy to fix, but it is quite common that you would need to make some changes. I’ve noticed Emax tends to ship out their drones set up in the TAER1234 channel map, which for me is perfect and matches how my transmitter is set up. GEPRC, however, tends to send their products set up in AETR1234.
This bit is quite common to mess up with newer people to the hobby but easy to fix. Go to your radio’s setup page and take note of what the channel map setup is. Then change the value here accordingly. As mentioned, in my case, I will change this to TAER1234.
In case you are wondering, the letters T, A, E, R simply mean that Throttle is at Channel 1, Aileron at 2, Elevator at 3 and Rudder at 4.
Modes tab
The modes tab is normally fairly straight forward as well, however, this was the ** the first time I see a manufacturer opting-in to set up switch activation at the low point of the range**. Technically, there’s nothing wrong with that, but if you don’t expect it, it might throw you for a loop.
In my case I totally didn’t expect this and was wondering why even though my modes are setup correct, the quad wouldn’t arm and was buzzing immediately when plugged in.
So the only thing I changed here was to drag the range slider to the upper end for the ARM mode on AUX1 and the same for the Beeper on AUX3. That ensures that the off position for the switch is away from you and the on position is when the switch is flicked towards yourself.
OSD tab
On the OSD tab, after the first flight I changed from displaying the total battery voltage to displaying the Battery average cell voltage, which I find slightly more informative and clear for when to land and so on.
If you enable RSSI value (like I did) and don’t see it anywhere, it’s probably under one of the values at the top left or top right of the OSD, so you might have to move them around a bit.
I also added Power to see throttle stick values in real-time.
And we are done with Betaflight.
To install the antenna tubes just cut them to length and slot them in while guiding the antennas thru. Then put an antenna tube cap on top.
Because this is an HD capable quad, we need to also install an SD card, so definitely don’t forget to do that.
By default, the camera is set up such that it will record in 1080p 60fps and it will start recording as soon as you plug in the quad and it will stop the recording and save the footage when you unplug the battery. It works in a very convenient way.
If you need to adjust the recording settings, you can use the provided camera joystick to connect to the camera (there is a camera connector under the canopy).
Finally put on the props. Remember that they should be in props in mode and so the way you put on the props should match what you see in the image below.
With all of this done, we are finally ready to go fly!
🚁 Flying
Maiden flight on GNB 4S 520mAh battery (127.3g AUW) with DVR overlay and a 5 second sound sample
The maiden flight went well. I was blown away at the amount of performance this drone has. This was the first time I had to consciously put effort to keep my throttle so low. I think the majority of the flight while getting used to how the GEPRC Skip3 HD flies I had to do my best to keep the throttle at 30-35%. The reason for that is that if you go slightly above that value, the quad TAKES OFF.
This genuinely made me wonder about how it would fly on 3S or even a 2S battery. However, there is no doubt that if you need performance and fly on 4S, the Skip3 HD will deliver.
Granted I was not pushing too hard this flight but I still got over 6 minutes of flight time which is good and talks to me about efficiency. This could be extended further if you fly on an even bigger battery. I flew on a GNB 4S 520mAh battery but I can easily see how the quad can handle a 650mAh battery without sacrificing too much performance for the extra weight. Let me know if you tested that and it worked for you.
If you get the Skip3 HD, clearly you care about the HD footage. This may mean that sometime you may want to zip around racer style (which this quad can do perfectly), and maybe sometimes you wanna go smoother and slower around objects, cinewhoop style. The Skip3 HD can do both of those things nicely.
I’m not the biggest fan of bi-blade props, I think in general I prefer tri-blade props because of the easier handling and in many cases, the performance/efficiency lost when compared to bi-blade props is nearly negligible. But this is my personal preference and I know of many people who swear by and prefer bi-blade props. I don’t think there’s a right answer here, it’s more about preference and what flight scenario you are trying to accommodate.
A thing to note is that the manufacturer EXPLICITLY STATES YOU SHOULD NOT FLY TRI-BLADED PROPS, TO PREVENT YOUR MOTORS FROM BURNING. I also recommend you don’t do that, but I will be testing that for you, so you don’t have to because I’m curious if I can make it work on a 2S battery for example.
Flight test in a big open field on a windy day
One of the first things I did when testing this drone was to go to the field where I usually only fly my 5-inch drones. It’s a pretty big open field and that day was a bit windy too - with wind up to 7-8 m/s. I was curious to test this after seeing that the Skip3 HD was a performance monster and indeed it handled the wind with no issues and it flew around (dare I say it) almost like my 5-inch drones. Very interesting. Flight time was still around 5 minutes, even though I was pushing it more and it had to combat the wind actively.
Flight test on a heavier 4S battery - Turnigy 4S 500mAh (149.7g AUW)
This next test flight was on a Turnigy battery I have lying around. I’m not a fan of this battery and I do not recommend you get, because it’s 22g heavier and offers 20mAh less compared to the GNB battery. The reason why this test is interesting, however, is that even in these conditions the GEPRC Skip3 HD didn’t care for it, it carried the extra weight like a champ and delivered a flight time of over 4:30 minutes against the wind. I think that’s cool and I’m pretty sure you will get even better results on a good GNB battery.
For example, a 4S GNB 650mAh battery would be about 25g heavier than the 4S GNB 520mAh battery I was testing with but will provide 130mAh more capacity.
I’m not planning on testing that scenario, however, because I’m happy with how it flies on the 520s I have.
Flight test on a 2S GNB 450mAh battery
Flying on a 2S 450mAh battery tanks the performance of the quad a bit and you might actually just like it. Immediately as soon as I took off I noticed the quad felt almost exactly as what flying my GEPRC Phantom feels like. It still performed somewhat decent, it was MUCH easier to handle and I had to maintain throttle closer to 50-60 % for a smooth flight (so higher than on 4S and much closer to what I’m used to).
I don’t recommend getting 2S batteries if you are buying now, but if you have some lying around it’s good to know that you can use them and get a decent flight experience from them.
Flight test on a 3S 300mAh battery?
I like how much raw power the quad has on 4S and I like how docile it is on 2S. Naturally, it makes me think flying it on a 3S battery might be some nice middle ground. However, I only have this 3S 300mAh battery which is of a way too small capacity for us to judge its effectiveness.
I will nevertheless fly it and take down some notes for the sake of getting a rough idea of how it performs.
And when I finally got around to testing it, there were no surprises - it flies just as fine on 3S and is somewhat easier to handle. However, I DO NOT recommend you fly as I did on just a 300mAh battery - this is way too small capacity (I only did it cause, that was the only 3S battery with an xt30 connector I had lying around). If you go 3S, make sure you get at least 500mAh capacity battery or why not even a 650mAh. The quad can carry that weight easily. Mentioning this, so you don’t get startled at the 2 min flight time on the video below, which is absolutely not representative of what this drone can do on a good battery for its capabilities.
On the other hand I caught a very sunny day on that flight and you can get a sense of how the camera performs in such conditions as well.
💀 Flight test on 2S battery with tri-blade Avan Rush 2.5” prop
I DO NOT RECOMMEND YOU DO THIS NEXT BIT! The GEPRC Skip3 HD product page explicitly states you should not try to run it on tri-blade props because this could lead to burning your motors.
However, I was curious and I did it for you, so you don’t have to wonder. Even though my first couple of test flights went well and I burned no motors (Yay 🎉!) I’d like to stress that I do NOT recommend you do this and if you do, do so at your own risk.
I decided to fly my favorite Avan Rush 2.5” tri-blade props. To begin with, I started with a 2S flight and was just cruising around at first, looking at the amps drawn. On average we were going around 4-6 amps, which is pretty decent.
💀 Flight test on 4S battery with tri-blade Avan Rush 2.5” prop
The next flight was on 4S and I have to admit I was a bit worried about how it would go. Luckily it was fine. I peaked up to 9 amps drawn on some tight corner turns and the motors were indeed just a bit warm after the flight.
We need to take into account that it was not a very warm day (maybe around 7-8 degrees celsius / 44f - 46f) and there was some cool wind. I mention this just in case it was what made the difference between cooled and burned motors.
I think going forward I’ll be flying mostly on 4S and with the tri-blade props and see how far we can get. I might add a slight throttle limit mostly to bring the normal cruising throttle values to slightly below mid stick position (35-40%), which is how I’m used to flying.
I don’t recommend you do this, but I am a big fan of the Avan Rush tri-blade props - they perform very nice, handle superbly, and are VERY quiet too. My theory is that GEPRC says you shouldn’t use 3” tri-blade props (the same size as the stock bi-blade props the drone comes with). I expect everything to be just fine and not to have any excessive amps drawn, due to the fact I’m going down to 2.5” props with the Avan Rush tri-blades. Only time will tell.
Here’s another test idea for you: fly it on 2.5” (65mm) bi-blade props and see how it does. It would make the Skip3 HD EVEN more efficient and you might end up with 7-8 minute flight times when cruising. That’s just my untested working theory. If you do test it, please let me know how it goes by dropping a comment at FPVtips on YouTube.
📑 Conclusion
I’m happy! I think I’ve finally found it - the HD toothpick I’ve been searching for.
Simply put, the GEPRC Skip3 HD marries the HD capabilities of a drone like the Mobula7 HD with the flight performance of a toothpick like the GEPRC Phantom or the Emax Tinyhawk Freestyle. But this is not just a simple combination of features and an incremental upgrade. The performance alone is a huge upgrade with support for up to 4S batteries and is probably more than what most people would ever need.
At the same time, you get nice long flight times of more than 6 minutes cruising and over 4-minute full-send zipping around.
If on top of all of this you prefer bi-blade props and the way they fly then you will love this drone. If like me you prefer tri-blade props, you could risk it, downsize to 2.5” and try the Avan Rush tri-blades. I don’t recommend you do this, because it could lead to burned motors, according to the manufacturer, but I’ll take my chances and let you know what happens in a few months. I just gotta have me some tri-blade props.
I did notice some very slight hints of jello in the HD recording when going strong against the wind, so I will be monitoring how that plays out, but in general, I’m satisfied with the quality of the HD recording.
I did have something bizarre happen twice. When I plugged in the quad but did not immediately take off for about a minute or so, after taking off I had a lot of latency in the FPV feed which I had never experienced before. Luckily after quickly landing and power cycling the quad the problem goes away. I have no idea what this is about and if you do know please drop a comment. I’m thinking it could be the VTX starting to overheat after a bit if not cooled down by the air brushing past it when the drone flies, but this is just a theory. It’s also not a consistent thing and only happened a couple of times out of about 10 or so flights.
I’m looking forward to flying this quad a ton more this spring and summer and I feel pretty happy about it because I seem to have finally found the toothpick that can record HD and also flies like a rocket.
Happy flying!
🕔 Post Evaluation
After having flown this quad for a few months I’m still pretty happy with it overall. I have no upgrade ideas, but I did want to come back and share with you about the Gemfan 3016 tri-blade props. They were recommened to me by a viewer on my YouTube channel and I have to admit they deliver.
Bare in mind, running tri-blade props would increase the risk of burning a motor, so if you decide to go for it, do it at your own risk. I want to make that clear and I do not want to endorse doing this if you’re not up for the damage you could cause to your quad.
With that out of the way, I’d say for now, I’m really, really happy how the drone flies with those props. Just going from 2.5 to 3 inch makes a big difference in terms of raw performance, but at the same time the Gemfan 3016 props handle just as easy as the Avon Rush. Big fan.
“I’ve just got this drone and having a bit of trouble binding it - for some reason the xm+ receiver is the other way round with the f/s button towards the front. I’m using the X-lite pro but am getting no solid green light.” - Drone-noob
The steps mentioned in this article should work for you too, unless you have some mismatching firmware issues. Make sure that both your radio and the FrSky XM+ receiver run the same firmware (either FCC or LBT). Also check out this article for even more detailed instructions. - Georgi
***
Share this on social media:
Need even more FPV in your life? Check out my YouTube channels: