


It’s truly a great time for our FPV racing and freestyle hobby. For one, we get to enjoy a pretty rapid rate of tech improvement. Even though I’ve been into FPV drones for about a little under 3 years, it never ceases to amaze me just how much things have changed.
The Mobula 6 micro drone is a living embodiment of these rapid changes. It’s a very well-executed product, and at only 20g it’s easily one of the smallest and lightest micro drones out there, that still zips around plenty fast on brushless motors and handles superbly.
I’ve been buying and trying Happymodel’s products since the Snapper7 a few years back, and have never been disappointed with any of them. The Mobula7 HD was a particular favorite of mine from 2019, and I’m still planning to try out the Larva X HD a bit later this year too.
That’s all just to say that while I do like Happymodel, I will be, as always, telling things as they are and not be fanboying around. This is not a paid advertisement, just my experience with the Mobula6. And it blew my mind a little bit 😅. Let’s take a look at what all the fuss is about.
Table of contents
If you prefer watching, check out the full video review on my YouTube channel:
📦 Unboxing
The unboxing experience is fine and pretty minimalistic, I think in a good way. The Mobula6 arrives in a small cardboard box.

And here is everything you get inside. Besides a print copy of the user manual,

you get a tiny Philips head screwdriver, prop remover tool, USB battery charger,

4 spare Gemfan 1219 props,

4 Happymodel branded 1S 300mah batteries (pretty sweet),

and the Mobula6 itself.


📝 Specifications
In terms of specs, the biggest deal here is the weight of the drone.

The Mobula6 comes in at barely just 20g dry weight with props. Or 19g without props, as 4 props add up to a gram.

The all-up-weight (AUW) with the provided stock battery is just 27.7g.

With a GNB 1S 450mah battery, the AUW is 33.3g

Speaking of batteries, the Mobula6’s battery connector is the common and popular among tiny whoops PH2.0. Great for battery re-usability if you have plenty of those lying around already.
The canopy is plastic and allows for adjusting the camera angle via screws (I haven’t had to do that though). It’s somewhat sturdy, but I think it has a couple of weaker points towards the lower back. We’ll have to see how it holds up.

The same goes for the frame. I don’t expect miracles from it, but it’s held up fine for now and I’ve smacked my Mobula6 around quite a bunch indoors and outdoors over the past couple of weeks. The only thing so far is the plastic getting a bit whiter on one spot after a harder impact, but didn’t crack and remained still solid and in one piece. If needed replacement frames are easy to obtain for about $4.
I would imagine you could probably even print a micro-frame yourself? Let me know in the comments if anyone of you has ever had some luck with 3D printed frames for micro drones in particular.
The battery bay houses the provided 300mah batteries perfectly as you would imagine. For bigger batteries, you can remove the battery bay completely, or use a rubber band for a somewhat decent fit, while not damaging the capability to fit perfectly the stock batteries. I’ll show you how I attached my 450mah batteries a bit later in the article.

The Mobula6 comes with an option of 19000KV or 25000KV motors. Not super much difference, but I opted in for the 19000KV version. The motors are Happymodel branded SE0802 with 1mm shaft diameter. They spin up Gemfan 1219 tri-blade props which provide excellent handling in turns and offer more performance than quad-blade props.

Everything else on this quad except the camera is on the same PCB. As always there will be people that like this and those that don’t. I’m in the fan camp. The big drawback here is that burning out 1 ESC, messing up your VTX or receiver, or say breaking the micro USB port, and you gotta replace the whole board.
On the other hand, you get all the weight and space savings and in a way simplicity of just having to order one thing.
The built-in vtx and receiver antennas are guided out the sides of the canopy - there are plenty of holes and options on how to get that done.
The camera is RunCam Nano 3. It’s a really good CMOS camera for its size and comes in at only 1.2g. You can adjust the camera angle via 2 screws on the sides of the canopy. And possibly adjusting the foam padding placed under the camera to combat jello which it does, but not 100% successfully (as you can see in some of my outdoor sample footage).
The flight controller board is the Crazybee F4FR Lite in my case, where the FR part stands to tell it’s the FrSky version with built-in SPI based FrSky receiver. It can only handle 1S batteries so don’t even think about 2S (although the motors wouldn’t handle that either).
The receiver is gonna get you about up to a couple of hundred meters max (100m = 109 yards). The ESCs are rated for 5A continuous current. The on-board VTX transmits a signal at 25mW power and can be controlled via Smart audio (through the OSD).
The micro USB port is easily accessible and the whole board is mounted to the frame with rubber grommets to dampen vibrations.
Overall, especially for being a fairly cheap product, the components are of good quality and the execution and build and very well done. Bonus points for twisting around and sticking between the frame the power leads, instead of just leading them out straight from the battery pads. This helps reduce tugging tension on them, which is unlikely but might occur if your battery flies out of the mounting bay mid-flight.
⚙ Setup
As with most other quads, to get started we need to bind a radio controller to the drone’s receiver and take a look at the Betaflight configuration.
🔗 Bind the receiver to a radio
The Mobula6 comes with a printed manual, but you can also get it online in pdf form. It is a simple, to-the-point-one-pager, useful to quickly answer some of your immediate questions, such as, where is the bind button 😅? Spoiler alert: it’s right next to the motor plug for the back left motor and is tiny.

I’m using the FrSky Taranis X-Lite radio, but this setup is very similar to most FrSky radios running OpenTx. Create a new model, go to the Setup screen, scroll down, set the Mode to D8 and press the [BND] function. The radio will start chirping looking for a receiver.

Then plug in the drone’s battery and press the Bind button. The receiver will bind to the radio. Stop the radio Bind function by exiting out of it. Unplug the drone. Plug it back in. At this point, you should see a solid green light to verify that there is an active link with the radio.
We’re almost done, one last thing to do is to go to the Mixer screen in the radio and add switches to channels 5, 6 and 7. Those channels will correspond to aux 1, 2 and 3 in Betaflight and we will need them to arm and activate various flight modes.

If you need more help here is a more detailed explanation on how to add the switches and how to fine-tune the channel outputs.
👀 Check the Betaflight configuration
Before we even start going through and potentially changing the Betaflight configuration, it’s a good rule of thumb to export a copy of the current configuration as a backup, in case we need to restore it later.
You can do this by going to the CLI tab and running the dump command. Then save that information to a file. Now you have a backup. If you ever goof up, you can load the configuration back from that file or by pasting its contents straight into the CLI here.

If you didn’t do that, I’ve done that for you - here is the stock Mobula6 Betaflight configuration dump for v3.5.7.
Configuring the Mobula6 was the first time I didn’t touch a single option in Betaflight. Why I’m sharing this is because I’ve been noticing a trend of having to do less and less before I get up in the air flying when setting up a new quad. I think that’s great and I wanted to take a moment to appreciate it. Tinkering with your quad to your heart’s content is not going anywhere, but it’s nice to see the barrier of entry getting ever so slightly lowered, this is great if we want to welcome more and new people to the hobby.
This is the shortest possible checklist of what I go through quickly when checking a quad’s configuration:
-
Configuration tab
Props in or Props out mode - important to know how to put on your props.
MOTOR_STOPoff.Accelerometeron for angle (stability) mode.SPI RX supportandFRSKY_Dfor D8 mode.
Airmodeis on.RX_LOSTandRX_SETare on in case you want to use the motors to beep for a lost model alarm since we don’t have an onboard buzzer.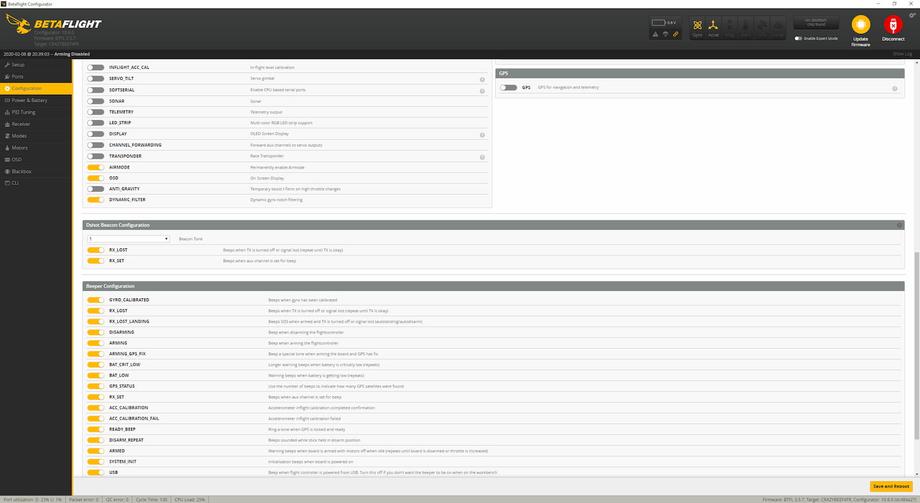
✅ All good here, the defaults match what I expected so no changes needed.
-
Receiver tab
Here I’m making sure the
Channel Mapis TAER1234. That’s what my radio is set to and a match here makes sure the quad won’t flip out when I start flying. ✅ All good.
-
Modes tab
Arming is set to
AUX1which is whichever switch you set toChannel5earlier in the Mixer screen on your radio. That’s fine. Then I notice AUX2 (Channel6 switch) is set by default to start-up in angle mode, and any other position will set the quad to acro. That’s fine too. And I have turtle mode (Flip over after crash) on the third switch. ✅ Perfect, no changes needed.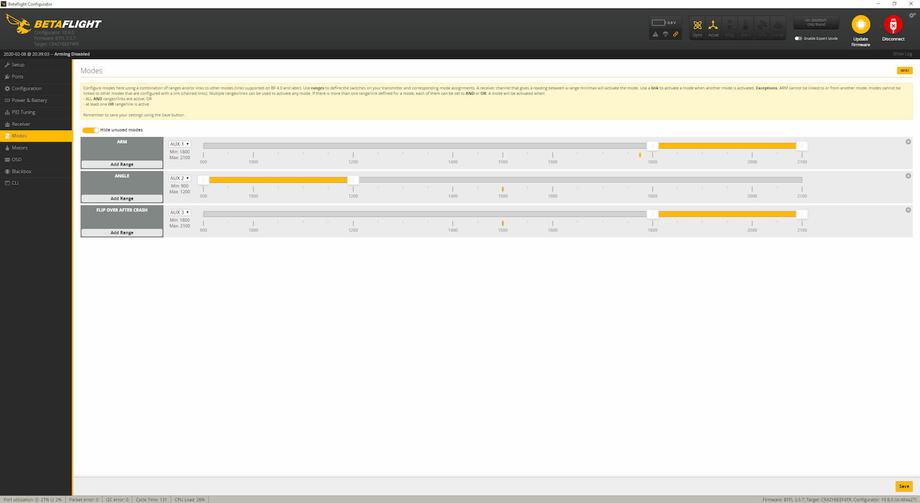
-
OSD tab
In the OSD tab I care to see if
RSSI valueis displayed, I also like to see current draw, throttle value and flight time elapsed. ✅ All good, no changes needed.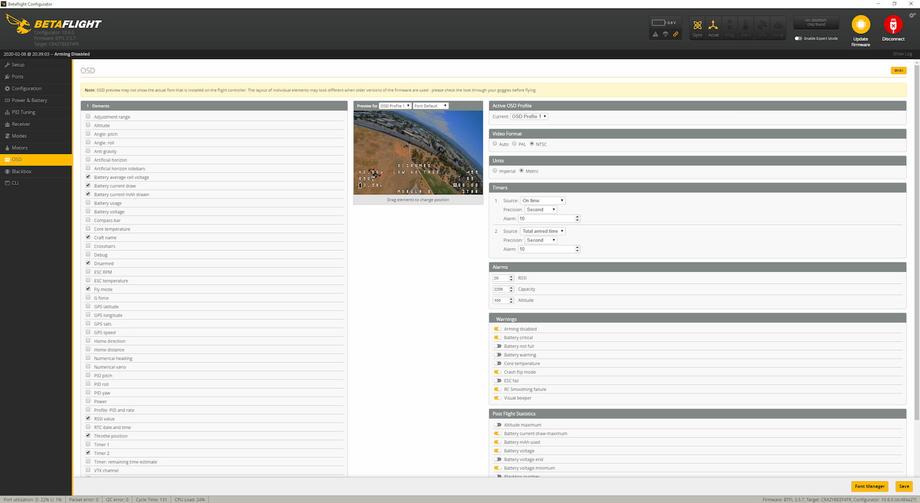


Let’s go fly!
🚁 Flying
I was very excited and curious to fly the Mobula6 for the first time. My first immediate impression was how easy it was to handle without sacrificing any performance. It only took me a couple of packs to get very comfortable with the drone. I started by flying it on the stock configuration.
🏡 Maiden indoor flight, stock 300mah battery 🔋
I always enjoy trying out different battery and prop combinations in my reviews and this time I had a lot of tests to carry out.
Besides flying on the stock Happymodel 300mah battery, I wanted to see if there was any difference with a similar Eachine branded 300mah battery.

The short of it is that there was no noticeable big difference, despite the fact the Eachine battery is engaging in some “slight” false advertising, stating its C rating is higher than it actually is (40C on the outer label, 30C on the battery enclosure). This makes it essentially identical to the stock Happymodel battery and since it did perform very similarly in my initial tests, the tests for the Eachine battery ended here.

The third battery I wanted to try out was this GNB 450mah as I have plenty of those lying around.

And since we’re doing this for science, I wanted to try out each battery type indoor and outdoor. Then, I wanted to do it all again after I did the 48kHz esc flashing mod.
Before I show you the flight footage, here is the comparison and my findings of flying different battery sizes, indoor, outdoor and before and after flashing the ESCs. All batteries were high voltage (HV) batteries and were charged to 4.35v.
| 🏡 Indoor 300mah battery 🔋 | |
|---|---|
| Stock ESC | Average ~ 4:17m |
| 48 kHz ESC | Average ~ 5:05m |
| 🏡 Indoor 450mah battery 🔋 | |
|---|---|
| Stock ESC | Average ~ 5:16m |
| 48 kHz ESC | Average ~ 4:24m |
| 🌄 Outdoor 300mah 🔋 | |
|---|---|
| Stock ESC | Average ~ 4:00m |
| 48 kHz ESC | Average ~ 4:15m |
| 🌄 Outdoor 450mah 🔋 | |
|---|---|
| Stock ESC | Average ~ 2:45m |
| 48 kHz ESC | Average ~ 3:45m |
Perhaps an interesting observation is that while I could fly fairly decently indoors on a 450mah battery and with increased flight time, the story was quite the opposite outdoors. I got consistently much shorter flight times, had to be almost at all times at more than 60% throttle and I could feel the weight of the battery significantly impacting the flight performance.
I’m fairly convinced a 350mah battery (didn’t see any 400mah available) might be the best option on the flight time vs performance trade off. I’ll be doing that test as soon as I can, but do bear in mind, for now, that’s just my hypothesis and if you’re unsure, but want to grab extra batteries right now, the 300mah URUAVs or GNBs are a safe bet.
🏡 Indoor flight, 450mah battery 🔋
Since the battery didn’t fit into the battery bay I used a rubber band to mount it.


I could feel the extra weight a bit but it wasn’t too bad. I assume mainly because my place is a bit small and I don’t reach particularly much higher than cruising speeds.
🌄 Maiden outdoor flight, stock 300mah battery 🔋
I was very impressed how this little guy held up outdoors and did not expect it to be that good. My house is a bit too small to be able to fly indoors in acro mode, but that was not the case outside. I really loved flying it in acro mode! Locked in tune and easy to handle! If you watch one video only, watch the one below.
🌄 Outdoor flight, 450mah GNB battery 🔋
This flight was a bit of a letdown. Unlike the indoor 450mah battery flight, here I got a pretty short flight time of around 2:30m. It was a pretty calm day with a bit of slight breeze every once in a while. The bigger battery’s extra weight seemed to take its toll and was noticeable even when cruising as I had the throttle higher on average.
So how did things change after I flashed the JESC 48 kHz firmware? Let’s compare.
🏡 Indoor flight, JESC 48 kHz, 300mah stock battery 🔋
On average we gained a flight time increase of + 48 seconds. Not bad at all! Also chances are I’m flying even faster since I’ve gotten so much more used to the Mobula6 by now.
🏡 Indoor flight, JESC 48 kHz, 450mah GNB battery 🔋
It would appear that we have lost up to - 52 seconds of flight time. Given in the first attempts I was flying much less aggressive and had a few crashes I needed to recover from with turtle mode (which counted as flying time) this could explain the result. HOWEVER, I never claimed nor attempted for the highest accuracy scientifically correct experiment, but the point here for me still stands - at best, there is no improvement in flight time with the heavier battery.
🌄 Outdoor flight, JESC 48 kHz, 300mah stock battery 🔋
I’ve been having plenty of bad weather, but was finally able to try flying the Mobula6 outside after the upgrade. On average I didn’t notice a crazy big improvement, although there was an improvement in flight times of about 10 - 15s.
🌄 Outdoor flight, JESC 48 kHz, 450mah GNB battery 🔋
I’ve been having plenty of bad weather, but was finally able to try flying the Mobula6 outside after the upgrade. I’ve been getting between 3:30 and 4:00 flight times, so there has definitely been an improvement since the ESC firmware upgrade. Bare in mind I conducted those tests at about 0 - 2 degrees Celsius (32 F), so in slightly warmer weather you might get even better results. All in all I’m happy with the results.
🔝 Upgrades
We already get pretty decent flight times of about 4:00 - 4:30 minutes. What if we could push this further?
- Flash 48 kHz ESC firmware
This has been an amazing discovery/knowledge shared around our FPV community. I first found out about it in Joshua Bardwell’s Mobula6 video’s comments section, posted by a user called Dan Miller. Thanks for sharing that with us Dan! I’ll go through the exact procedure how to set it up a bit further in the article.
- Replace the PH2.0 connector with the new BT2.0 connector by Betafpv
Claimed to deliver up to 10% battery overall performance boost
- Remove motor plugs and direct solder motors to the board
Unless I get very bored, I won’t be bothering with this, but some people believe this does improve performance a bit. I’m not saying it won’t, but I’m not convinced it’s worth it. Nevertheless, it’s here on the list if you feel like truly maximizing your Mobula6’s performance.
- Use Betaflight 4.1 and RPM filters?
My Mobula6 came with
Betaflight v3.5.7on it. If you wanna do RPM filters, you need to use version 4.1. Filters are known to improve flight characteristics, but I’m not sure if they will help with battery life. Chances are they might. Do some more research first, though, and let me know too. - Is a battery size of 350mah the best option on the weight vs performance trade-off?
I’m curious to learn more about this one. I’m quite convinced that a 350mah sized battery would be the best fit, but I have yet to test this.
- Discover better props?
This seems a bit like a long shot, as the Gemfan props already perform stellarly. You never know though! Let me know if you discover better props.
I’m just wondering if we can get up to 7 or why not even 8 minutes of flight time on the Mobula6 😬. Let me know if you carry out all of these upgrades and manage to reach some sick flight times, I’d be very happy to hear about it!
Why all the min-maxing though? Well for one, this quad is doing so many things so well and is so light that small changes to weight can have significant impact. Also, it’s fun 😅
💾 How to flash Mobula6 ESC for 48kHz
This is the one upgrade that’s gonna take you 1 minute to do and will increase your flight times by at least 30 seconds. It’s that simple.
Just a word on BLHeli Configurator vs JESC Configurator. I normally use the BLHeli Configurator to do my ESC flashing, and you can use it to do the 48kHz firmware upgrade. However, that requires manual download of firmware files and is a bit more error-prone, while using the JESC Configurator, in this case, is super straight forward, so we’re going to use the latter.
First, google for jesc-configurator and open the Releases and Install instructions links, in my case the first and third results in the list.

The Releases link is going to take you to the corresponding page on the jesc-configurator on GitHub where you could download the software for your operating system. Download and extract the package and then start up the software.

The other link we opened contains the installation instructions, and the only thing to pay attention to, as highlighted in the screenshot below, we need to check if H is the middle letter in the ESC code, once read into the JESC software.

As a rule of thumb always take off the props when dealing with drone ESC or flight controller configuration. Next, plugin the Mobula6 via a micro USB cable to the computer and also plug in a battery since we need power to the ESCs to read the setup.
Let’s look at the configurator. It’s very similar to the BLHeli Configurator, in case you are familiar with that one. Select the correct COM port from the dropdown at the top right-hand side. It should normally be preselected correctly. Click the blue Connect button.

You are presented this screen. Click the Read Setup button on the bottom right-hand side.

If all goes well you should now see all 4 ESCs listed in the right half of JESC Configurator. Take a look at the ESC code and make sure the middle letter is H as mentioned as a requirement in JESC’s installation instructions. In the screenshot example below I have already flashed the JESC firmware successfully.
Click the Flash All button at the bottom.

In this last step, select the JESC 2.3 - 48khz option from the Version list and click Flash.

Wait until all 4 ESCs are flashed successfully. When done click the Disconnect button at the top right, unplug your quad from the micro USB cable and the battery.
Congrats 🎉! You should now have on average 30 seconds longer flight times for free. How cool is that?
📑 Conclusion
Happymodel has once again delivered a fun experience. I’m trying hard not to overhype or call the Mobula6 a technological achievement but in my opinion, it kind of is. It comes at a very affordable price for what it offers, you get 4 batteries to rip around which for many beginners could just as well be enough.
With flight times of 4:30 - 5:30 minutes, chances are by the time you’ve flown your other 3 batteries, the first will have charged-up if you plugged it in immediately after you flew it. So you could go for some pretty long flight sessions.
If this is your first quad getting into the hobby, I’m very comfortable recommending it, as you will get an outstanding indoor experience and you would be able to rip some packs practicing acro mode outside as well.
I love how light it is, and even though it already flies really well on Betaflight v3.5.7, upgrading to 4.1, flashing the ESCs for 48khz PWM and the other potential upgrades I’ve highlighted above could deliver some outstanding flight times.
That’s cool because if this is your entry into the hobby, you can learn so much by tinkering with these things and trying out different setups. At the same time even if you just want to grab it and fly, you can do that in seconds. As I mentioned earlier I had to do nothing in Betaflight! This too is amazing because it lowers the barrier of entry to our hobby and really if you have a pair of goggles and a radio, you can just bind to this guy in a few seconds and start flying!
I’m looking forward to ripping more and more packs on the Mobula6 throughout the remainder of the winter and I’ll surely take it out with me when I start going to parks in the spring.
Happy flying!


